Sections expand and collapse to hide some parts if you don't want the whole plot revealed. Prerequisites and the First Step are always opened at the start and don't close automatically unless you trigger them.
Difficulty: 2 of 10
Duration: 2 of 10
Released: 21 July 2009
Todo:
- scope map.
- Trollwiess zoom map.
- Levels of ice trolls and Zemouregal's zombies.
- Ritual keep zoom map.
- Zemouregals base (chaos temple) zoom map.
- Zemouregals base interior map.
- Cropped quest complete.
- Quick solve.
- Zemouregal's notes info.
 |
Defender of Varrock complete Missing My Mummy complete with Senliten 100% restored Shades of Mort'on Troll Romance The Tale of the Muspah |
 |
 61 61 64 64 64 64 37 37 64 64 41 41 66 66
|
 |
Rock pick, 3 Dwellberries, 1 dose Sacred Oil, Ring of Life, Insulated boots, Macaw Pouch, Mithril or better crossbow, Grapple |
 |
Defense or armor for Level 120-124 Ice trolls under Trollweiss, Level 41 Small scarabs in the Ancient pyramid, Level 85 Armoured zombies in Zemouregal's wilderness base, a good weapon to battle Arrav (Level 180) to a standstill, and enough hits available when undoing the door lock in Zemouregal's base in case of being found and busted outside. |
 |
| |
Fairy Tale 2 started for Fairy Rings ? for Trollweiss teleport |
| |
 99 for Trollweiss teleport 99 for Trollweiss teleport
|
| |
Dramen or Lunar staff, Duel ring, Runes for trollweiss teleport |
Exp. |
900030000900025009000400014000
|
Points |
1 |
Where |
|
Using |
Suggested: Shantay pass, Full Waterskins, Enchanted water tiara, coins for carpet transport, Ring of charos (a), Dramen/Lunar staff (code:DLQ) |
Concerns |
Kharidian desert dehydration outside the city limits. |

Ali the Wise asks for your help with his Mahjarrat studies. Agree, and he will tell you how Jhallan's information on the Ritual led to tunnels a colleague of his located on the Trollweiss Mountain. The tunnels lead under the Ritual site but his colleague did not have the mining experience to get through. |
Where |
|
Using |
Climbing boots (if taking route from Burthorpe) or Trollheim teleport runes, Rock pick, Weapon, a few Food |
Concerns |
Cold stat damage, Level 120-124 Ice trolls |
|
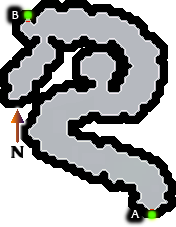
The best place to start from is Trollheim. Get there by using the Trollheim teleport or make your way from Burthorpe. Northwest of the Trollheim ziggurat is the icy path to the north, the same path you had to take to recover the trollweiss flowers in Troll Romance. The north end of the path can hit you with cold damage. Enter the cave on the west side at the path's end. Ice trolls protect the cave so run through it with protect from melee on, exit at the other side and you emerge onto Trollweiss Mountain.
Unlocks "Lamistard's Labyrinth" Head from that cave to the east and enter the cave there. The rock falls have rocks that can only be mined away if mined from several directions. The simple solution is to mine as much as you can from one way then find the way around and mine from the new direction until you've mined them clear. Mine H from the south path. Mine through I and mine H from the east passage. Mine J through. Mine L from the west cave. Mine K through. Mine M from the west and then the north side. Finish L from the north side and then M from it's south side into the basement.
The tablets are Lamistard's journals. The notes on the shelf in the basement are made by Zemouregal on his fellow Mahjarrat. Pick them all up and the next time that you reach a bank, stow them there until the end of the quest. Climb up the stairs and into the Ritual building.
|


Where |
|
Using |
Any decent weapon |
Concerns |
Level 180 Arrav (You will only be fighting him to a stand-still.) |
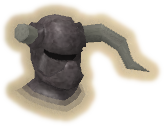
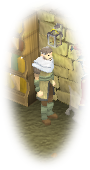
After walking up the stairs here, you see Arrav, the shell of the once hero of Varrock. He is not hostile at the moment, so he could be questioned. Unfortunately once he is disturbed, Arrav must obey Zemouregal's impulses on him. He will attack, even though he states that it's not his desire. As you fight, he haltingly reveals that you can find something to help the both of you behind the flame tapestry in the south room. Zemouregal calls on him and he quits the fight and teleports away. Enter the room and you may find the flame tapestry Arrav mentioned on the west wall. When you search it, you find plans to Zemouregal's base and a key for it as well! The plans are quite complex but no doubt Ali the Wise would be able to help you decipher them. You strike out to return to him. |
Where |
Ali the Wise's Home, Nardah |
Using |
Base plans, Base Key, Desert travel gear, Dramen/Lunar staff |
Concerns |
Desert dehydration outside the city |
|
Upon returning, you show Ali the Wise what you found. Going over the plans, Ali notices something about the heart of Arrav. That seems to be what the once-hero was referring to. But then Ali details the base defense and security systems. Most of the defenses trigger an alarm and release a gas that knocks out intruders. Then they are removed from the base, perhaps slightly damaged either by what they triggered or the guard that moved them out. While a cutscene of the base plays, Ali mentions: the spells to detect humans which trigger the alarm, the possible route through kitchen sewers with electrified floors, the zombie guard that patrol the halls, the code locked vault door (fail twice triggers the alarm), and the firey beams canvasing the room where the heart is kept (also alarm). While all of that is a tall order, he guesses the real difficulty is how to take the heart without killing Arrav (unless we we're planning to end his suffering). Organs separated from the body sounds familiar, like a certain mummy we've met. Time to go have a chat with Senliten. |
Where |
|
Using |
1 dose Sacred oil (see Shades of Mort'on minigame), 3 Dwellberry, Ring of life, Desert travel gear |
Concerns |
Desert dehydration, Level 41 small scarabs, Tile puzzle trap |
|
You can only complete this quest if Senliten's restoration is complete. (See the Missing my Mummy quest notes.) Head north and then east to the Ancient pyramid where Senliten's spirit resides. Enter, go through the imposing door and down the stairs. Cross the tile trap on the blue and green tiles. If there is not a way across, go up the stairs and back down until it changes. 
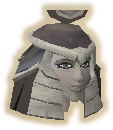
Speaking to Senliten, you ask about a means to recover the heart of Arrav. She comments on the dark nature of the magics done but is able to suggest a means to help. She provides you with an empty canopic jar and says it must be filled with some sacred oil, 3 dwellberries, and a ring of life. Add the items to the jar to create a full canopic jar.
|


Where |
Ali the Wise's Home, Nardah |
Using |
Desert travel gear |
Concerns |
Desert dehydration outside the city |
|
Upon returning he checks that you have solved the matter of the heart. Then he goes on to detail what you will need in general to overcome the obstacles he found in the plans earlier. Thinking of the electrified sewers he mentions that you will need insulated protection for your feet. You will need to be able to have eyes somewhere to watch out for you, like when checking the halls patrolled by a zombie guard. At the last, you will no doubt need a grappling hook, as well as the crossbow to shoot it. After all, what good heist would be possible without those? Slayers happen to know about insulated footwear. Combat with Killerwatts requires it. See a slayer master about Insulated boots if you don't already have a pair. As for an extra set of eyes, any summoned familiar can offer a set. However, most wont tell you what they see except for macaws. You'll need a macaw pouch to be your lookout. Also bring a crossbow and a grapple. If you dont have a grapple, you can smith one from a mithril bar, attach it to the head of a mithril bolt and tie a rope on it. |
Where |
|
Using |
Armor for protection, Base key, Crossbow, Grapple, Insulated boots (worn), Macaw pouch, Full canopic jar, food to replace hp, Dueling ring or Games Necklace to teleport closely, also another teleport to get you back to Ali the Wise such as a Slayer ring or Glory Amulet with a Lunar/Dramen staff |
Concerns |
Level 85 Armoured zombie, several traps (most can be avoided) |
|
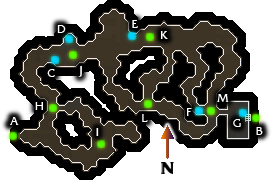
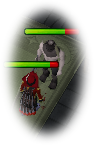
When you are inside the main part of the base in the trapped areas it's a good idea to keep up your hit points. You could be hit hard by the defenses, hard enough to kill you if you've let your points go too low. In the Defender of Varrock quest you were able to delve about halfway into Zemouregal's base. The key you found will allow you to see most of the rest of it. If you recall you could go through several doors as you learned of the mahjarrat's plans for the city. There was a door on the north side of the base that was locked however ... that's where you are headed, where the Base key will give you access. Whether you use a jewelry teleport or walk all the way, make your way to Zemouregal's base under the eastern wilderness chaos temple. You may wish to use pray against melee as you enter the base to save hits against the zombies in the halls. Move along the hallway until you reach the last door and go through.
Unlocks "The Heist" You will head east and pass the main entry hall that you saw in Ali the Wise's fly-through. Use the door to the kitchen. In the south wall of the kitchen is a drain pipe that you can fit inside. Make sure that you're wearing the Insulated boots and enter the pipe. Run the length of the sewer until you find the other end with the drain opening. You might pause to inspect he cage nearby. It's another example of Professor Oddenstein finding security uses for electricity and creatures that generate it. Time to call your macaw familiar. Interact with it to use it's remote-view ability. It balks for a moment at being sent first into dangerous areas but once through and when the zombies have passed you crawl trough after it. For the next part you need to move fast or you'll be waiting for when the patrol moves back to a safe distance. If the zombies get line of sight on you, your caught, beaten repeatedly, and moved out of the base. |

Where |
Deep inside Zemouregal's Base |
Using |
Grapple, Crossbow, Full Canopic jar, Teleport to get Back to Ali the Wise |
Concerns |
Patrolling zombies on a 5 minute timer, security system traps |
|
You need some clues on defeating the locking mechanism on the vault. Get into the room to the south. Searching the west table you find some Decoder strips. The chest along the south wall has a Closed chest that contains a Code key. These two pieces are what you need for the door. Searching the east table will yield the other half of Zemouregal's notes on his fellow mahjarrat so grab that too. Read the Code key and take note of the four letters on it. The next part has you sending some time in the hall. If your not sure the guard are going to be out of the way long enough you can go to the pipe, enter the sewer, and use the macaw to check the hall again. This will reset the timer (so to speak). You head out to the door and if you try to open it you notice it's secured but there is a keypad to the north side. Operate the keypad to see the lock. You see your decoder strips under one set of controls next to a four digit numeric lock with its own buttons and a table of numbers. The code is a replacement cypher. Each strip is numbered one thru four, one strip for each digit in the combination. The strips have a window so that if placed over the correct row of the table (using the arrow buttons above the strips) they reveal the digit for that strip. What row do you place them on? That's where the Code key comes in. Say that your Code key reads "ABCD." (I wonder how many of the the thousands of players got this. There should have been a few ... there's only 6561 possible codes.) So the first letter is "A," that means you place your "1" strip over the "A" row in the table. That reveals a number. You use the up-down arrow buttons under the code panel to pick the number and the left-right buttons enter that number and step to the slot left or right respectively. Do the same thing for each letter on the code key using each of the strips. Lucky people have four different letters in their key. That means that you can place every one of the strips on the table and read all the numbers off at once. (The author ... >me< ... had code "GGGH" ... I had to place strip "1," read it, move it away, place strip "2," read it, move strip, place "3" and "4" ... ok, rant over. ^^ Fear for those that had "DDDD" or the like. =P ) So, find the numbers for your key, enter them in, and when they're right you hear the locking mechanism unlatching. Open the door and get in before the patrol sees you. Look at the pretty flame lasers ... oh, but dont touch. Curiously, with all those barriers in the way, there's a pipe near the ceiling that a nimble person, a well prepared one, could use to just pass them by. Wow, Ali really is wise. Ready the crossbow and grapple the pipe. You crawl along the pipe and drop in front of Arrav's heart surrounded by the eldrich spell. You did bring the Full canopic jar, right? Grab the heart and you pop it right in the restorative jar. You can now teleport out with your prize! It's time to head back to the wise man. |
Where |
Ali the Wise's Nardah Home |
Using |
Heart in a canopic jar, also bring your tablets of Lamistard's Journal and Zemouregal's notes |
Concerns |
Desert dehydration outside the city |
|
After returning to Ali the wise you turn over the Heart to him. He plans to do studies into how it my be returned to Arrav to free him.  After the completion, you can discuss the journal and the notes with Ali to add to his information on the mahjarrat. They can be destroyed afterward. |
|
|
Stone Tablet The Journal of Lamistard. It is imperative I get as close to the Ritual stone I can this time. For too many Rituals now the same few have gained much power while the rest of us have stayed on the outskirts and remained weaker. If only I could get close maybe I'd become a force in the next battle. Granite Tablet I have a cunning plan. I have started to dig some tunnels that will eventually lead directly under the stone. This time I will be as close as possible. I have found the ideal site to start digging - an isolated mountainside reachable only via troll tunnel. No one will disturb me here. Slate Tablet I am making progress with the tunnels, although I hadn't appreciated what hard work it would be. As I'm going to be down here a little while and might as well make myself comfortable, I have created some living quarters of sorts. I wish I had some of that papyrus they've invented. Chiselling is so laborious. Shale Tablet I have been struggling to get precisely under the stone. I've wasted time digging tunnels the wrong way. I seem to have hit some sort of brick structure, possibly a cellar belonging to one of the others. Maybe if I break through it I can get my bearings. It will be dangerous though - I don't want to be detected. |
|
-INFO- |
-INFO-
|