Sections expand and collapse to hide some parts if you don't want the whole plot revealed. Prerequisites and the First Step are always opened at the start and don't close automatically unless you trigger them.
Difficulty: 6 of 10
Duration: 5 of 10
Released: 3 Dec 2009
 |
Where |
|
Using |
Suggested: Shantay pass, Full Waterskins, Enchanted water tiara, coins for carpet transport, Ring of charos (a), Dramen/Lunar staff (code:DLQ) |
Concerns |
Kharidian desert dehydration outside the city limits. |

Visit Ali the Wise in his Nardah home. As you start to talk, the conversation quickly turns to religion. Essentially he has found the Mahjarrat split into the camps supporting Zamorak or Zaros. Ali is favoring the Zarosians especially given the threats and damage levied by Zamorakian Mahjarrat. You agree to points about Zaros' deserved support and Ali will ask you to meet a colleague of his at the Dig Site. The name is Dr. Nabanik. If you ask about help getting to the Dig Site, Ali will provide you with a brand new Dig Site necklace (five charges) to teleport you there. |
Where |
After making it to the Exam Center, you may find Dr. Nabanik wandering about the courtyard. Shortly you realize the "Doctor" is a disguise crafted by the Zarosian hero, Azzanadra. He has been attempting to access the temple you discovered when first exploring the dig. The examiner has been blocking him however because he lacks proper accredidation. Given your previous help and your record with the powers-that-be, Azzanadra enlists your aid. He asks you to speak to the archaeological expert. You have to promote "Nabanik's" trustworthyness and have a restoration certificate issued so that he will be allowed to repair the temple. |
Where |
The Digsite Examination Center |


Inside the Center, find the expert. According to him, Nabanik said his paperwork was beetle food and he was out of touch in a pyramid for some time. You place yourself as his reference first, given your good standing at the center. You can vouch for how big the beetles in the desert can grow. Also, it may give the expert some pause but you can mention Nabanik's studies include the ancient magics. Lastly, you avow his participation in the recovery of lost "desert treasure." Note: I used the lines above to get Nabanik approval. I believe there may be other options that will work as I am fairly sure some won't. With the expert's fears asuaged, he provides a certificate to you for Dr. Nabanik's approved restoration. Walk out to Azzanadra and speak to him. He will take the cert and ask you to meet him in the temple ruins. You mention the prior need of a rope to get down and Azzanadra provides one. Go to the winch in the northwest of the site, use the rope on the winch and head into the temple area where reconstruction is already underway. |
Where |
|
The displaced peoples of the bandit camp are now working to reconstruct the temple to Zaros under Azzanadra's direction. They have a few things that they say but you can speak to Azzanadra without missing anything for the quest. Azzanadra relates that the construction goes apace now that his lackeys are hard at it. However he can use a person of your skills to retrieve two dangerously protected items. The first is a prayer icon guarded over by the barrows brothers in their Morytanian tomb. He relates that you must defeat each of the brothers to insure that you may recover the icon from the chest in the maze; so that none are left to hide it.
Azzanadra may talk at length about Zaros, the city, and the temple if you want to ask. He will only discuss the items after you have retrieved them. None of this discussion is necessary for the quest in any event. It's time to pack your gear and head to hazardous hideouts. Note: Either of the two items should be able to be recovered first. I recovered them in the following order. |
 The second item is the Frostenhorn. It was secreted away in an
ice-bound fortress in the north lands. To gather clues as to how
to proceed, Azzanadra gives you the ruined backpack of his last
contact that went in search of this item.
The second item is the Frostenhorn. It was secreted away in an
ice-bound fortress in the north lands. To gather clues as to how
to proceed, Azzanadra gives you the ruined backpack of his last
contact that went in search of this item.
 The pack falls apart as you check it, revealing a heat globe
and a battered letter. Reading the letter, you find the globe is
one of many at the fort. But the author didn't have runes to take
them from a distance, even when Azzanadra mentions this servant
would have been well stocked with combat runes. Seems he needed
Telekenesis runes. Also, discussing the pack with Azzanadra, he
believes the char marks on it indicate there are dragons in the
area of the fort.
The pack falls apart as you check it, revealing a heat globe
and a battered letter. Reading the letter, you find the globe is
one of many at the fort. But the author didn't have runes to take
them from a distance, even when Azzanadra mentions this servant
would have been well stocked with combat runes. Seems he needed
Telekenesis runes. Also, discussing the pack with Azzanadra, he
believes the char marks on it indicate there are dragons in the
area of the fort.Where |
|
Using |
Shovel, Combat Equipment for at least 2 styles, prayer potions (depending on prayer level), food |
Concerns |
Ghasts en route to Barrows, Torag, Dharok, Guthan, Verac, Karil, Ahrim, various creatures in the Barrows maze, regular prayer drain while in maze |
|
Make your way to the Barrows minigame. If you cannot bank in Burgh de Rott, it would be well to bring druid pouch charges to protect your food. The best route is the Myreque pass to the swamp boat. If you've ever done the Barrows game by this point you have an advantage of familiarity. Higher level players will also have an upper hand especially with high prayer as well as combat levels. Basically, every setting is random. There are six brothers. Each of the mounds (barrows) is one of their graves. You dig on a mound to get in. Inside is the sarcophagus of that warrior. After you search it, the brother will attack. Five tombs will be occupied by certain random brothers while one leads into the barrows maze. The brother not in his tomb guards the maze along with dozens of lower creatures: rats, leeches, skeletons. While you are inside, every time one of the brothers transparent faces appears on your screen your remaining prayer points drops a bit. You have to search the maze, where the minimap does not work, for a room with a puzzle lock. When you answer the puzzle and enter, you find the reward chest inside. Now, for the quest you must defeat each of the five entombed brothers before entering the maze. After entering you have to kill the remaining one and find the chest room. The Barrows icon will be in the chest along with a reward typical for the Barrows game as long as you have defeated all the brothers.
As far as tips go: bring replacement prayer points (potions) and several good food. Each brother has a certain combat style that you can pray against so that's no issue; 4 meleers, 1 mage, 1 range. Keep an eye on your prayer remaining due to the area drain and Verac's (?) pray draining special. The puzzle is a Structure of Intelligence multiple choice question. You can guess but it's a 1 in 4 chance. You still have to be quick because a creature might attack you and take you out of the question before you can answer. Easy ... isn't it? After recovering the icon, return to Azzanadra and give it to him. He's very satisfied with its collection of prayer essence, with which he plans to call out to Zaros. Then it gets colder ... |

Where |
|
Using |
Heat globe, Hammer, Telegrab runes, Combat Equipment, Antifire protection, food, some prayer |
Concerns |
Deep wilderness travel, Steel dragon, Level 189 Iron dragon, Level 115 Water fiend, Level 177 Ice demon |
|
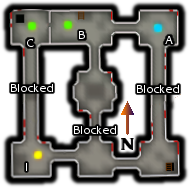
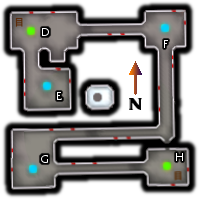
Azzanadra explained the fortress where the frostenhorn resides was only approachable from the western deeps of the wilderness. If you look to the map you can see the fort's walls bordering the frozen waste plateau beyond the deep wild fenceline. This means watching out for revenants as well as the expected dragons and other water and ice based foes. When you arrive at the pass to the fortress, you find a huge snowball blocking the way. There is a pedestal to the side as well. Use the heat globe on the pedestal and it's nearby heat melts the ball enought to pass it. Take care here, steel dragons guard the fortress. Go the the fort's south gate and enter. Snow, ice, and frozen doors have turned the fortress into a maze. Enter through the main gate on the south side. Use the stairs to the west of the entrance to reach the raised walkway. Head east along the walkway and descend the east stairs. Note the damaged wall with it's handholds to the side of the door. Use them to reach the walkway again. Heading north you may take note of a smashed pedestal. It will be useful later. Walk around to the northwest side where the ruined rampart provides a route back down. After that, you can see a trapdoor. Enter the subfloors there. The ice demon you are looking for is on this level, you just have to find a way through the frozen halls. You can refer to the following maps. All passages are blocked. There is a heat globe on a pedestal in the room to the east (A). Take it and place it on the pedestal in the first room where you came down the stairs from the trapdoor (B). This opens the way west and releases a level 115 water fiend. Melting the blockages here always frees a water fiend so be ready for them. Now stand on the other side of the wall in the west room (C) and telegrab the heat globe. Place it on the pedestal here to melt both the passage you came through and a trapdoor down to the second sublevel.
You see another pedestal here (D). There is a heat globe on the floor of the southward room (E). Get it and place it on the pedestal. This thaws a block in room E and opens the eastward passage, so head east. You can take the globe here (F), but a part of the pedestal has fused to it. Remember the smashed pedestal on the wall above? Retrace your steps back to the northeastern wall. The part of the pedestal the globe normally fits to is on the ground next to its pillar. Fit the imperfect globe to that smashed bit. Now it's turned the snow into an icy ramp. Try pushing it (right-click push) and watch it slide into a maw in the center of the fortress. This ends up on sublevel two where it opens the passage south from room F.
Go all the way down to the second subfloor and to room F. Now follow the passage south and then east to the next room (G). Take that heat globe off of the pedestal. Backtrack down the passage you just came trough until you see the pipe in the wall ... aimed right at a pedestal. Could you actally be that lucky to push it in there and hit the pedestal. Well, it's not that easy. Doing the above gets it stuck. But you can use a hammer on it. Hitting the globe in the pipe knocks it through. It bounces and settles on the pedestal ... score! This unblocks the hall from room G to the eastern room (H). The ladder there leads up to the south hall of subfloor one and you can head west to the hall where the ice demon wanders. The level 177 demon is physically small but size is no tell of this creature's ability. It has a freezing spell and a thick hide. If you cant kill it quick it will hurt you before it dies. Praying against magic will block the freezing at least and that makes the fight simple, beat it until it dies. Pick up the Frostenhorn from its ashes on the ground.
|

Where |
Senntisten Temple under the digsite. |
Using |
Frostenhorn |
|
The temple has been restored as you were out and about. It's beneficiator is awaiting you. Azzanadra takes the item and confirms it's power is intact. He will explain that the frostenhorn (it's Fremennick name) was never about cold or ice. It is a kind of amplifier or maximizer. With it's presence, abilities or attibutes of certain things can be increased to extreme levels. This effect should magnify his prayer contact to Zaros by many times. As if you should expect it, one more thing is necessary. Another of Azzanadra's associates is bringing a last bit. He does not wish this contact allowed inside the temple however so he asks you to go topside and collect the final item. |
Where |
Digsite at entrance to Senntisten temple |
|
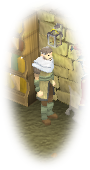
There at the entrance is an assassin, a familiar assassin. This is the mysterious robed monk near Paterdomus, the thief who stole a Relic from Entrana ... with your help! That was his assignment, his task. He turns the item over to you, caring very little now that his task is complete. Take the item to Azzanadra.
|

Where |
Senntisten Temple under the digsite. |
Using |
Relic |
|
Sharing you opinion of those who zarosian agents would employ, you turn over the relic to Azzanadra. It seems the saradominists coopted the relic for their own. But it was older than their actions, according to Azzanadra. The collections are complete. The temple rebuilt. Azzanadra now has you witness the purpose of all this. He calls out to Zaros, making the first attempt in ages to reopen the long defunct contact portal. And a god answers. 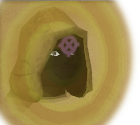
Zaros appears in a portal near the altar. Azzanadra, faithful zarosian mahjarrat, speaks to his lord for the first time in ages. After a short update, they speak between themselves in private. |
Where |
Senntisten Temple under the digsite. |
|
After the contact, Azzanadra is well pleased with your aid. He provides you with some choice in experience gifts and the means to use ancient curses instead of prayer. 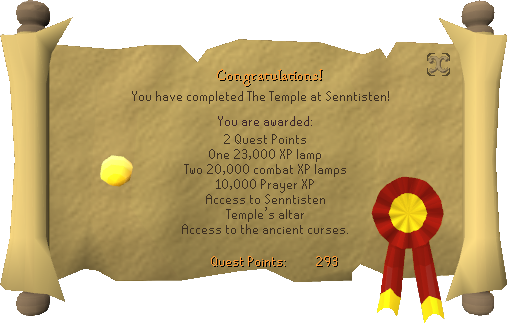 |
|
| Coming soon... |